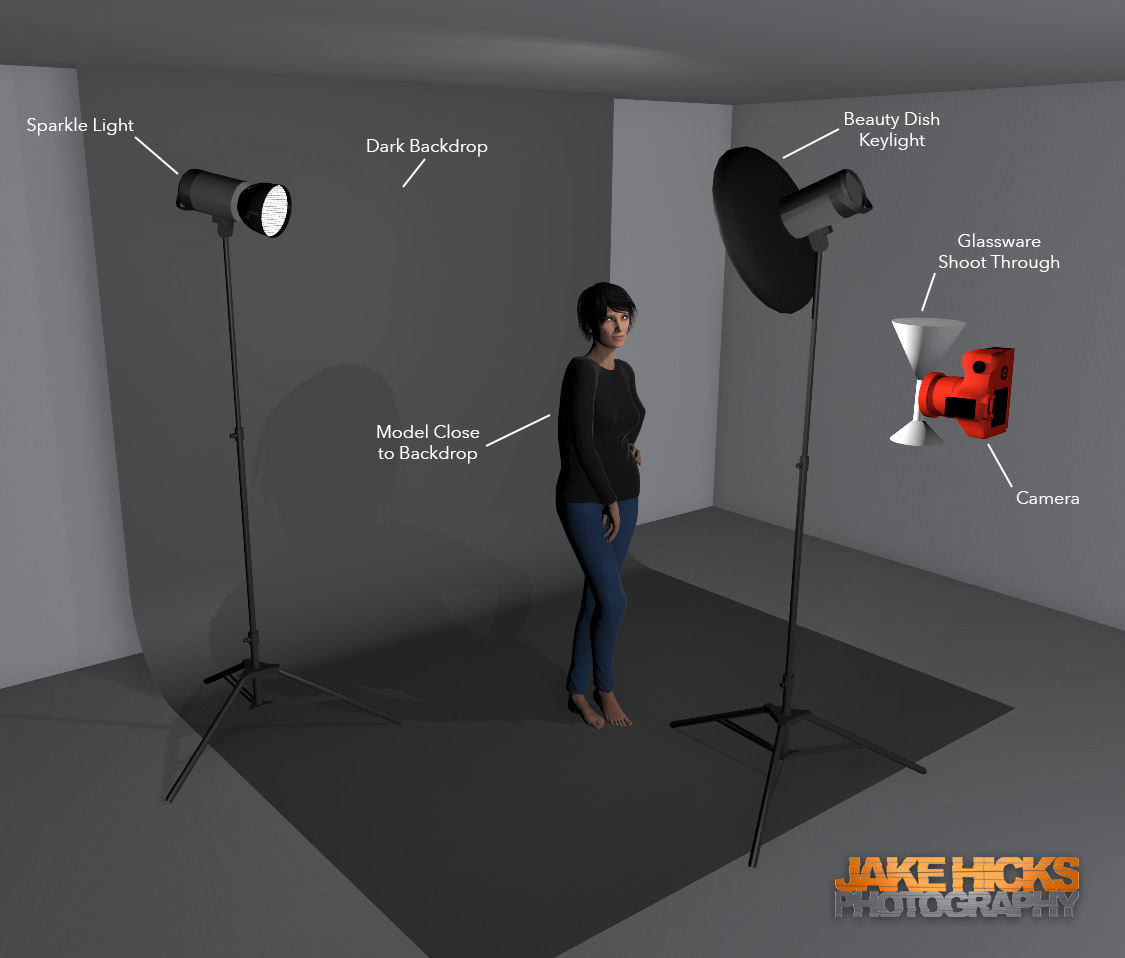

Studio portrait photography is a type of photography where subjects are photographed in a controlled indoor environment, typically a photography studio. This setting allows the photographer to have precise control over lighting, background, and other elements to create high-quality, well-composed portraits. Studio portrait photography is commonly used for professional headshots, family portraits, fashion shoots, and various other types of portraiture, as it provides a consistent and controlled backdrop for capturing subjects in a visually pleasing and often flattering manner.
What the Difference is Between a Headshot and a Portrait
How to Build a Modeling Portfolio
Learn What Modeling Digitals Are
Learn How to Make a Photo Studio
Studio lighting setups for portrait photography play a pivotal role in achieving the desired mood, style, and quality in your photos. These setups involve strategically positioning and controlling artificial light sources to illuminate your subject effectively. Here are some common studio lighting setups frequently used by photographers:
1. One-Light Setup (Key Light): This is a basic setup featuring a single primary light source, known as the key light. It's positioned to one side of the subject, creating strong shadows and depth. This setup is ideal for dramatic or high-contrast portraits.

2. Two-Light Setup (Key and Fill Light): In this setup, the key light remains the primary light source, while a second light, the fill light, is added to reduce shadows and provide a softer, more balanced illumination.
 Jake Hicks Photography
3. Three-Point Lighting: This classic setup consists of a key light, a fill light, and a backlight (or hair light). The key light is the primary source, the fill light softens shadows, and the backlight separates the subject from the background, adding dimension.

4. Rembrandt Lighting: Named after the famous artist, this setup creates a distinctive triangular highlight on one side of the subject's face. It's achieved by placing the key light at a specific angle to the subject, creating a pleasing blend of light and shadow.
5. Loop Lighting: Loop lighting is similar to Rembrandt lighting but with a slightly different angle of the key light. It forms a small loop-shaped shadow under the subject's nose, offering a flattering and classic look.
6. Butterfly Lighting: Also known as Paramount lighting, this setup involves placing the key light directly in front of and above the subject's face. It creates a small, symmetrical shadow under the nose, resembling a butterfly's shape.
7. Broad and Short Lighting: These setups are variations of portrait lighting based on the subject's facial structure. Broad lighting illuminates the broader side of the face, while short lighting highlights the narrower side. Photographers choose between them to emphasize or de-emphasize facial features.
8. High-Key and Low-Key Lighting: High-key lighting involves using bright, even lighting to create a clean, minimalistic look. Low-key lighting employs strong contrasts between light and shadow for a more dramatic, moody effect.
Here are some valuable tips for successful studio portrait photography:
1. Plan Your Concept: Before you even step into the studio, have a clear concept in mind for the portrait. Think about the mood, style, and story you want to convey. This will guide your choice of lighting, props, and poses.
2. Select the Right Background: Choose a background that complements your subject and concept. Seamless paper, canvas, or textured backdrops are popular options. Ensure it doesn't distract from the subject.
3. Use Quality Lighting Equipment: Invest in good studio lighting equipment, including strobes or continuous lights, softboxes, umbrellas, and reflectors. High-quality lighting gear makes a significant difference in the final result.
.jpg)
4. Understand Lighting Techniques: Familiarize yourself with various lighting techniques, such as the ones mentioned earlier (e.g., three-point lighting, Rembrandt lighting). Experiment with different setups to achieve the desired effect.
5. Control Light Intensity: Adjust the intensity of your lights to control highlights and shadows. Use diffusion and modifiers to soften and shape the light. Avoid harsh, unflattering lighting by diffusing it appropriately.

6. Position Your Subject: Proper posing is crucial for portrait photography. Guide your subject into flattering positions, paying attention to body angles, facial expressions, and hand placement. Communicate and provide feedback throughout the session.
7. Focus on the Eyes: The eyes are the windows to the soul. Ensure they are well-lit and in sharp focus. Use a wide aperture (low f-number) to create a shallow depth of field that emphasizes the subject's eyes.
8. Consider Wardrobe and Styling: Encourage your subject to wear outfits that fit the theme or concept. Pay attention to details like hair, makeup, and accessories. These elements can significantly impact the final result.
Check Out The 15 Best Spring Outfit Ideas - Stylist Choice
9. Shoot in RAW: Capture your images in RAW format to retain maximum detail and flexibility during post-processing. RAW files offer more control over exposure, color correction, and retouching.
10. Experiment with Angles: Don't be afraid to try different
angles and perspectives. Shoot from above, below, or at eye level to create unique compositions and visual interest.
11. Engage with Your Subject: Building rapport and making your subject feel comfortable is essential. Engage in conversation, provide positive feedback, and be patient. A relaxed subject often results in better portraits.
.jpg)
12. Review and Adjust: Periodically review your shots during the session to make sure you're getting the desired results. Adjust lighting, poses, or settings as needed to improve the outcome.
13. Post-Processing: After the shoot, use photo editing software like Adobe Lightroom or Photoshop to fine-tune your images. Correct exposure, enhance colors, and retouch imperfections while maintaining a natural look.
14. Practice and Learn: Portrait photography is a skill that improves with practice. Continuously study and learn from other photographers, attend workshops, and seek constructive feedback to refine your craft.
